
If you're not familiar with Photoshop then read this tutorial New file for the Web before working on this tutorial.
Navigation is the most important graphic element in a Web site. A good navigation scheme is one that is both easy to find on every page and easy to use. It communicates clearly and simply where the viewer is in the site, where she can go from that point, and how to get there.
Add a set of matching buttons to a navigation bar.

This navigation bar image was made in Photoshop to take advantage of Photoshop's wide range of image-editing features. You could continue to use Photoshop to add buttons to this bar, but we recommend you switch to ImageReady for that purpose to make use of ImageReady's exclusive object-oriented tools (the Tab Rectangle tool, Smart Guides, multiple layer selection, layer groups, Move tool variations, and more).

2. Create a Button Shape
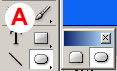
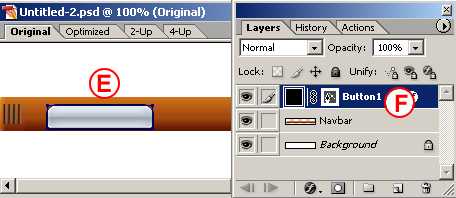
Start by creating one tab-shaped button. Select the Tab Rectangle tool in the ImageReady toolbox A. In the Options bar, make sure the Shape Layer icon is selected B. Set the button's size by checking Fixed Size and entering Width: 106 px and Height: 24 px C. Set the button's style by clicking the arrow on the Style field and choose Glass Table Cool style or just choose a different style. Select the Background layer in the Layers palette. Then click in the image to create a button on a new shape layer E. Give the layer a meaningful name by double-clicking Layer 1 and typing button 1 in its place F.

TIP: Turn Off Border.
You can hide the blue border that appears around your new button by choosing View>Show>Layer Edges.
3. Move the Button
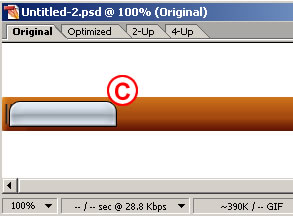
Now you'll turn the button upside down and hang it from the navigation bar. Select the Move Tool in the toolbox A, and make sure the Layer Select tool is highlighted in the Options bar B. This variation of the Move tool automatically selects the layer or layer group that contains the object you click on in the image. Click on the button you just made to automatically select the button 1 layer. Choose Edit>Transform>Flip Vertical to invert the button. Click and drag the button into position under the navigation bar's overhang C.

4. Add Button Text
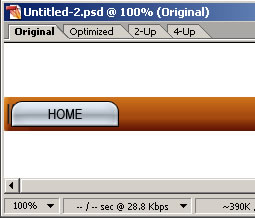
Select the Type tool in the ImageReady toolbox. In the Options bar, set Font Family to Arial Narrow or a similar font A, set Font Size to around 14 px B, and set Font Color to black C. Click on the button in the image and type home. This creates a new home type layer above the button 1 layer. Don't worry about where the text is positioned on the button for now.


(source: brainbell.com)

